Monday, December 08, 2025
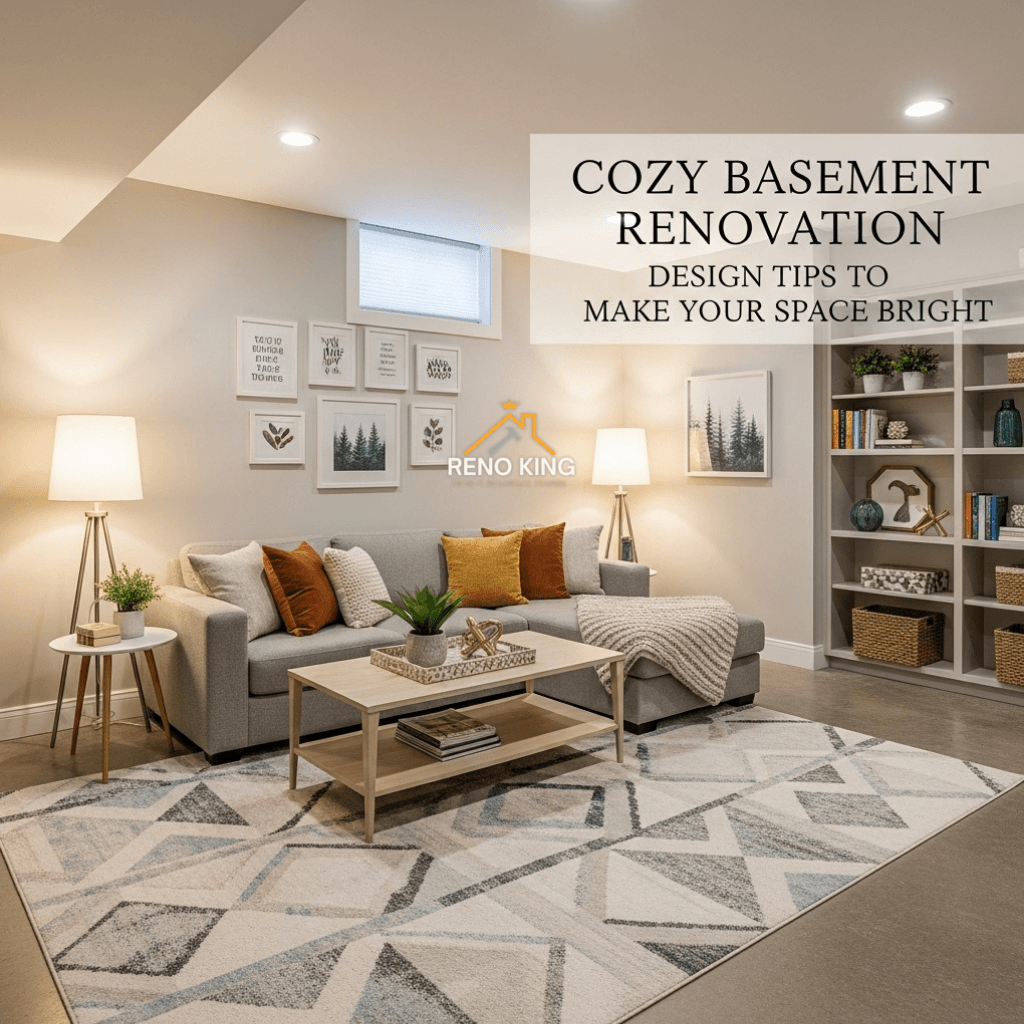
The basement. It’s the largest potential square footage in most homes, yet it often remains an afterthought—a cold, damp, and dimly lit storage space. Homeowners dream of transforming this subterranean area into a vibrant, cozy basement retreat: a media room, a sophisticated home office, a guest suite, or a vibrant playroom.
The single biggest hurdle in this dream is the lack of natural light. Basement spaces are inherently at a disadvantage, battling small windows, low ceilings, and the perpetual shadow cast by the earth around them. Simply covering the walls with paint and laying down carpet won’t cut it. A successful basement renovation that achieves true brightness and warmth requires a strategic, detailed, and holistic approach—one that treats light not as an afterthought, but as the foundational element of the design.
This masterclass guide will meticulously break down the five critical pillars of a light-maximizing basement renovation. We move beyond simple suggestions to provide actionable, technical, and aesthetic basement design tips to ensure your renovated space feels like a sun-drenched extension of your main floor, not a gloomy cavern.
1. Harnessing the Light: Strategic Lighting Layers and Technical Specifications
The most common mistake in basement renovation is treating lighting as a commodity. In a windowless environment, light is the architecture. We must move beyond the basic overhead fixture and employ a sophisticated, layered system that compensates for the missing sun.
A. Ambient Lighting: Calculating for Uniform Brightness
Ambient lighting provides the general illumination that allows comfortable movement and activity. In a basement, this is the backbone of brightness.
The Technical Edge: Lumens, CRI, and Color Temperature
- Lumens Per Square Foot (The Brightness Target): While living spaces upstairs might require 10–20 lumens per square foot, a basement needs more firepower to counteract darkness. Aim for 30 to 50 lumens per square foot for general ambient lighting. This might sound like a lot, but the reflectivity (or lack thereof) of the basement environment necessitates this higher output.
- Color Rendering Index (CRI): This often-overlooked metric measures how accurately a light source reveals the true color of objects compared to natural sunlight. Basements benefit immensely from high-CRI lighting. Always choose LED fixtures with a CRI of 90 or higher. A low CRI (e.g., 70s) will make colors look washed out or dingy, negating the effect of your beautiful paint and furniture.
- Color Temperature (Kelvin): As discussed, avoid the extremes. The warm, yellow light (2700K) feels cozy but can make a dark room feel dated and dim. The blue-white light (5000K) is too harsh. The ideal range for simulating clean daylight is 3500K to 4000K (Neutral White). This provides crisp, modern illumination that feels bright without being cold.
Strategic Recessed Fixture Placement
Recessed lighting (or “pot lights”) is essential due to the typical low ceiling height. However, placement is everything:
- Wall Washing: Position fixtures about 24 inches away from the wall and spaced evenly. Directing the light slightly downward and outward creates a “wall wash,” which highlights the vertical surfaces. This trick not only brightens the room by making white walls reflective but also visually pushes the walls away, making the space feel wider.
- Grid Consistency: Ensure a consistent grid pattern. In a dedicated rectangular room, spacing fixtures 4 to 6 feet apart usually provides uniform coverage.
B. Task and Accent Lighting: Adding Depth and Warmth
Once the ambient base is set, task and accent lighting introduce necessary contrast and visual interest, which contributes to the perception of quality and coziness.
- Up-Lighting for Ceiling Height: This is a fantastic trick for low ceilings. Use small, hidden fixtures (like strip LEDs or puck lights) placed on top of built-in cabinets or behind a crown molding (cove lighting). By directing light upward, the ceiling is subtly illuminated, blurring the boundary between the ceiling and the wall, and effectively lifting the ceiling height visually.
- Illuminating Vertical Spaces: Install slim linear LED fixtures or adjustable track lights to highlight architectural features like stone accent walls, custom millwork, or tall bookshelves. This focus on vertical elements also helps draw the eye up, counteracting the low ceiling.
- The Coziness Factor (Floor Lamps): Layering in non-recessed fixtures is essential for a cozy feel. Choose floor lamps or table lamps with warm, fabric shades. While the embedded LEDs are 4000K, these lamps can use bulbs closer to 3000K. This mix provides overall brightness from the ceiling while adding localized pools of warm, inviting light where people gather.
2. The Color Psychology of Brightness: Paints, Trim, and Textural Contrast
Color theory is your second major weapon against the basement gloom. It’s not enough to paint the walls white; you must understand how light interacts with the pigments and finishes in a low-light environment.
A. Mastering the Light Reflectance Value (LRV)
As a reminder, aim for an LRV of 60 or higher for major surfaces. However, avoid blinding, sterile white (LRV 95+).
- The Magic of Off-White: Choose an off-white or a very light greige with a subtle warm undertone (think a hint of beige, pink, or yellow). This warmth prevents the shadows in the corners from turning blue or gray, which is a common effect of pure white in cool, low-light spaces. Warm off-whites keep the room feeling inviting.
- The Ceiling Finish: Ceilings must be painted in a dead-flat finish. Flat paint diffuses light evenly and hides drywall imperfections, minimizing shadows. Use a pure white (LRV 90+) for maximum reflection here.
B. The Crucial Role of Contrast
Monochromatic light colors can be beautiful, but too much of the same tone can make the room feel washed out and dimensionless. Contrast adds depth and visual interest, which prevents the space from feeling like a photographic “white-out.”
- High-Gloss Trim: Paint all baseboards, door frames, and window trim in a semi-gloss or high-gloss finish using the same pure white as the ceiling. The contrast between the flat wall paint and the glossy trim creates definition and provides small, intentional reflective surfaces that catch light and sparkle.
- Dark Accents (Strategic Grounding): A bright room needs anchors. Use dark colors sparingly but intentionally—perhaps a navy blue throw pillow, a black console table, or a deep charcoal color on the back wall of a niche or bookcase. These dark accents give the eye a point of contrast, making the surrounding light colors appear even brighter.
C. Texture and Fabric Choices
Texture in the basement is essential for dialing up the “cozy” factor, but the material choices should also serve the goal of brightness.
- Soft, Light Upholstery: Choose sofas and chairs upholstered in light, soft fabrics like linen, light gray wool blends, or textured ivory performance fabrics. These textures absorb less light than heavy velvet or dark leather and maintain a comforting, airy aesthetic.
- Layering Sheens: Incorporate reflective textures like brushed nickel hardware, polished wood grain, and silk-blend carpets. These varied sheens ensure that the ambient light hitting the surfaces is reflected at different angles, creating a dynamic, bright environment rather than a static one.
3. Maximizing Natural Light: Structural and Mechanical Solutions
In basements, natural light often needs to be engineered. When renovation involves structural work, these elements are game-changers for long-term brightness.
A. The Egress Window Opportunity
If your local building code allows for new windows (and requires them for any habitable basement bedroom), this is your moment.
- Maximize Size: Install the largest window possible based on the foundation height and structural integrity. A larger window exponentially increases the light entering the space.
- Strategic Placement: If possible, locate the window on the wall that receives the most daylight exposure—typically the south or west side—even if it’s indirect.
- The Window Well Redefined: Modern egress window wells are not rusty metal cages. They can be finished with light-colored, natural-looking stone or composite material. Crucially, some designs include built-in steps or ledges that act as natural light shelves, reflecting sunlight downward into the room.
B. Vertical Light Tunnels (Sun Tunnels)
For interior basement rooms that are far from an exterior wall (e.g., a central hallway or bathroom), a Sun Tunnel (or tubular daylighting device) is a transformative solution.
- How They Work: These devices use a highly reflective aluminum tube to channel daylight collected from a dome on the roof down through the floors above and into a diffuser installed in the basement ceiling.
- The Effect: A well-installed Sun Tunnel can provide the light equivalent of three standard 100-watt bulbs, but with pure, natural daylight. It’s a remarkable way to bring true, unadulterated sunlight into the deepest parts of your bright basement.
C. Glass Partitions: Borrowing Interior Light
When dividing the basement into rooms, avoid solid drywall where possible.
- Full or Half-Glass Walls: Consider dividing a brighter zone (like a gym or playroom near the windows) from a darker zone (like a TV room) using interior walls featuring floor-to-ceiling glass partitions or internal windows. This allows the precious light harvested by the windows to penetrate deeper into the floor plan, ensuring a truly airy feel throughout the entire basement. Use frosted glass or internal blinds if privacy is needed.
4. Reflective Surfaces and Airy Finishes: The Bounce-Back Effect
Beyond paint, surfaces that inherently reflect light are critical in the low-light environment of a basement. They turn your room into a subtly shimmering space, amplifying the light you already have.
A. The Geometry of Reflection: Mirrors and Finishes
- Mirrored Wall Segments: Instead of just hanging a single mirror, consider installing custom mirrored tiles or panels that cover an entire wall or a substantial portion of it, especially behind a bar or in a home gym. This creates an optical illusion of double the room size and double the light.
- Polished Metals: Utilize hardware and fixtures in polished, shiny metals like chrome, polished nickel, or brass. These small, concentrated reflective spots catch the eye and add dynamic sparkle to the overall design. Avoid matte finishes for hardware if brightness is the primary goal.
- High-Sheen Countertops: In kitchenettes or bars, choose white quartz or light-colored granite countertops with a polished finish. These surfaces will reflect the under-cabinet task lighting beautifully, ensuring the work areas are never shadowed.
B. Flooring Materials that Aid Illumination
The choice of floor material contributes massive visual weight.
- Light-Colored LVT/LVP: Luxury Vinyl Tile or Plank (LVT/LVP) is often the best basement option due to its waterproof nature. Select a style in a pale gray, washed wood, or cream color. Look for LVP with a slight sheen, which helps reflect the overhead light.
- Polished Concrete: For modern or industrial basement design, polished concrete flooring is excellent. When polished and sealed, it acts as a smooth, continuous reflective surface, immediately giving the room a brighter, cleaner feel.
C. Minimizing Visual Clutter with Smart Storage
Clutter absorbs light and creates distracting shadows, making the room feel smaller and darker.
- Built-in, Seamless Storage: Invest in built-in shelving and cabinets that run floor-to-ceiling. Paint them the same high-LRV color as the walls. By recessing or seamlessly integrating the storage, you eliminate bulky furniture that casts deep shadows.
- Closed Storage: Where possible, opt for closed cabinets over open shelves. This hides visual chaos, presenting a smooth, bright wall surface to the eye instead of distracting collections of objects.
5. The Illusion of Height: Vertical Lines, Minimalist Layouts, and Ceiling Tricks
Basements are almost always characterized by low ceilings. The solution is to trick the eye by manipulating vertical perception and ensuring horizontal sightlines are unimpeded.
A. The Verticality Strategy
Everything that runs vertically should be emphasized.
- Doors and Casings: Use tall, six-panel or five-panel doors that draw the eye upward, and ensure the door casing extends as close to the ceiling as structurally possible.
- Wall Art: Hang large-scale vertical artwork or gallery wall arrangements that occupy the majority of the wall height, anchoring the vertical dimension of the room.
- Floor to Ceiling Windows (Where Possible): Even if the window itself is only three feet tall, using a continuous piece of glass from the floor to the ceiling (even with a wall section behind it) helps maximize the perceived vertical opening.
B. Ceiling Treatment for Maximum Height
The way you treat the necessary elements hanging down from the structural ceiling dictates the final height perception.
- Drywalling Utilities: Instead of opting for a traditional drop ceiling (which can easily eat up 6–8 inches of precious height), use drywall enclosures (soffits) only around the necessary pipes and ducts. Leave the rest of the ceiling as high as possible. This extra few inches can make a psychological world of difference.
- V-Groove Paneling: If you must cover a slightly uneven ceiling, install V-groove or thin shiplap paneling horizontally. Painting this white and running it the length of the room adds subtle texture but keeps the ceiling visually light and minimizes the appearance of bumps better than flat drywall.
C. Open-Concept Layout and Thin-Profile Flooring
An open, free-flowing floor plan is inherently brighter than a segmented one because light can travel further from its source.
- Minimal Division: Unless a private bedroom or bathroom is required, favor an open-concept layout that allows the light from the windows (or light tunnels) to penetrate the entire space.
- Flooring Thickness Matters: When calculating finished height, every fraction of an inch matters. Consider thin-profile flooring options. For example, LVP that is glued down or thin-set tile will often shave off half an inch compared to thick, floating subfloor systems, saving critical headroom.
Conclusion: From Dungeon to Destination
A cozy basement renovation is a major undertaking, but the rewards—a bright, functional, and inviting new living space—are invaluable. By systematically applying these detailed design tips, you transition from passively accepting darkness to actively engineering light. Remember the critical steps: establish a powerful 4000K, high-CRI lighting foundation; select high-LRV colors with warm undertones; utilize vertical lines and minimalist design to maximize perceived height; and employ reflective surfaces to bounce every available lumen.
This transformation requires meticulous planning, precision in execution, and an intimate knowledge of building constraints and codes—especially when adding structural elements like egress windows or managing complex utility runs.
From Blueprint to Brilliance: Partnering with Reno King
Understanding these principles is the first step; executing them flawlessly is the next. For homeowners in the [Insert Local Area/Region Here] region, turning a dark, theoretical blueprint into a luminous, livable reality demands the expertise of specialists.
At Reno King, we are not just general contractors; we are light architects and subterranean design experts. Our core philosophy is built around ensuring your basement renovation maximizes every available inch of height and every photon of light. We specialize in the complex, technical elements that make the difference: calculating the precise number and placement of 90+ CRI LED fixtures, designing custom soffits that discreetly hide ductwork while maximizing ceiling height, and installing code-compliant egress windows and Sun Tunnels to dramatically increase natural light input.
We ensure your renovation is structurally sound, fully waterproofed, and leverages the right high-gloss and flat finishes to create that coveted bright basement atmosphere. If you are ready to stop settling for a dark cellar and start enjoying a truly vibrant extension of your home, Reno King provides the technical mastery and design finesse required.
📞Contact Reno King today to schedule a consultation and take the crucial step from planning to enjoying your bright, beautiful, and cozy basement retreat.